 |


|
#1
 04-05-2012, 06:18 PM
|
||||
|
||||
|
***Disclaimer :
Neither OlYeller nor FordRangerForum.com accept any responsibility for actions taken during or resulting from attempting this modification. Bear in mind that you perform this modification solely at your own risk. *** -In other words- This is a simple modification, where nothing really can go wrong but if it does, not my fault I know there is a thread on this already, but no how to, so here it is. This is the mod/fix for you if your floor gets wet after it rains or you wash your truck, or if your air smells nasty or moldy coming out of the vents. This was done on my 2001 Ranger Edge. all 01-03 trucks should be the same, reguardless of trim level. not sure about 83-00 and 04-11 trucks. but any 93-11 trucks should have about the same steps TOOLS I USED 8mm socket 5.5 mm socket 1/4in ratchet Screwdriver I could put sockets on Crows Foot Drill 3/16 drill bit First things first, pop the hood, and unbolt the fuse compartment under the hood. the bolts should be silver. They take a 8mm socket to undo 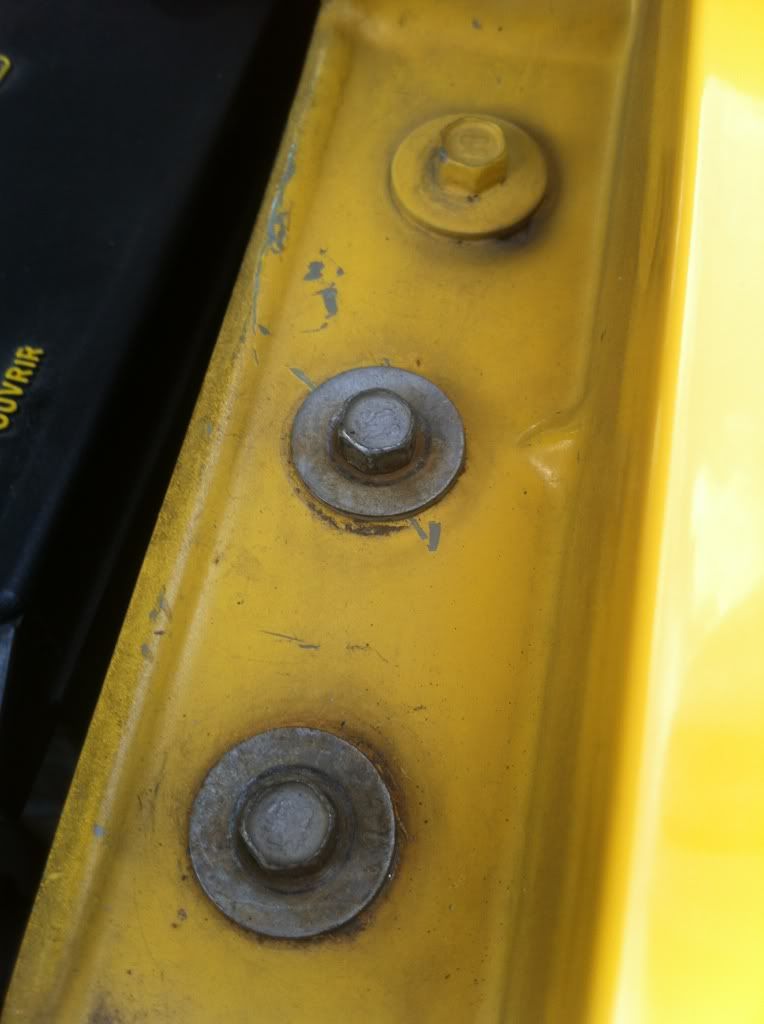 MANUAL TRANNY TRUCK OWNERS- read this! the clutch fluid resvior is mounted to the fuse compartment, so be careful not to damage it on any other engine part while moving the fuse compartment around. Then, you will be able to access all the screws that go to this access door 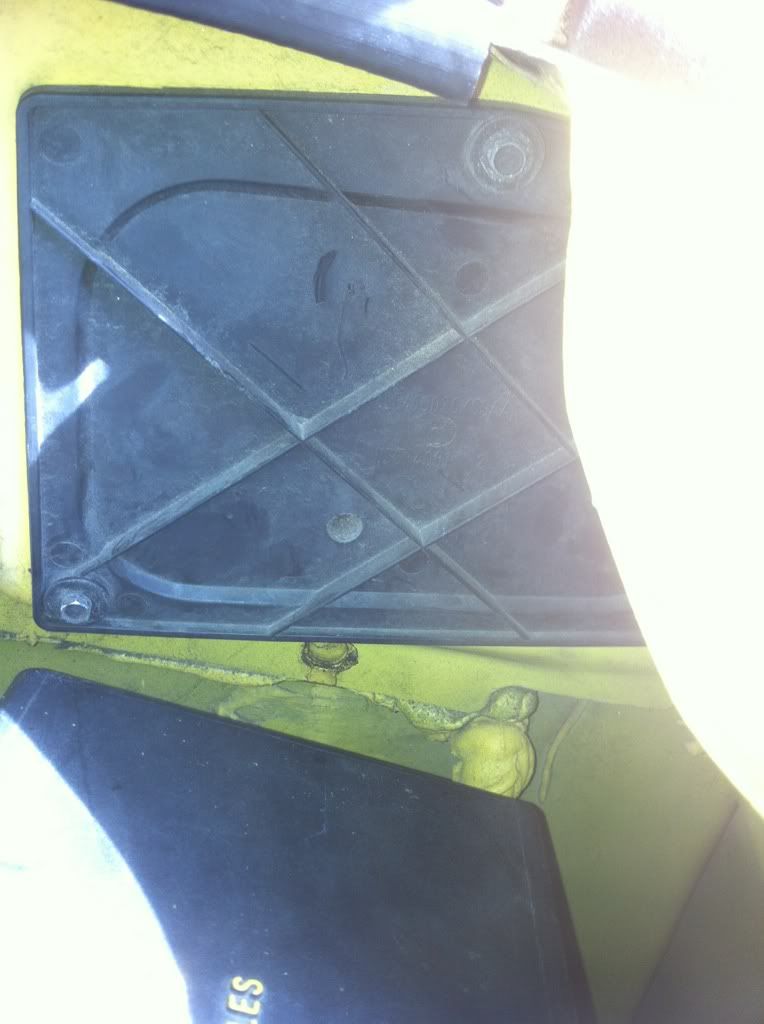 there is one hidden one in the corner 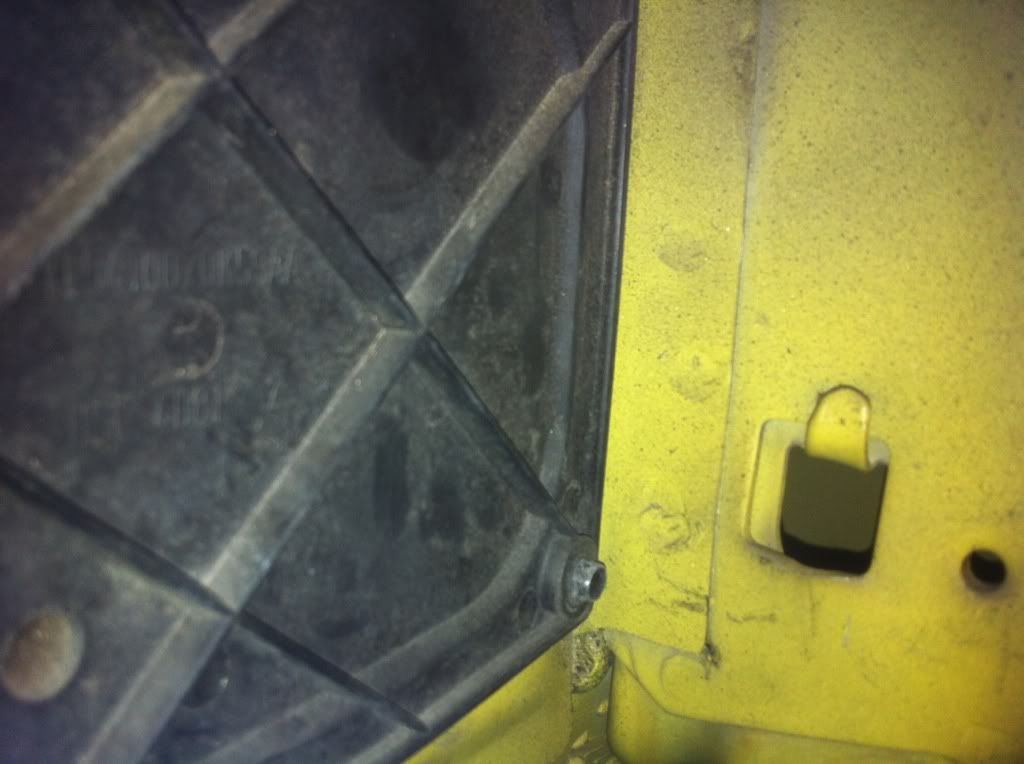 its a 5.5mm socket. It REALLY helps if you have an adapter that lets you put sockets on a screwdriver after undoing those screws, there is a thick rubber/foam gasket on the access door. Take your time, and gently pull the door off. If you are careful enough, the gasket will stay on the door, and you wont have to replace it now you will see this 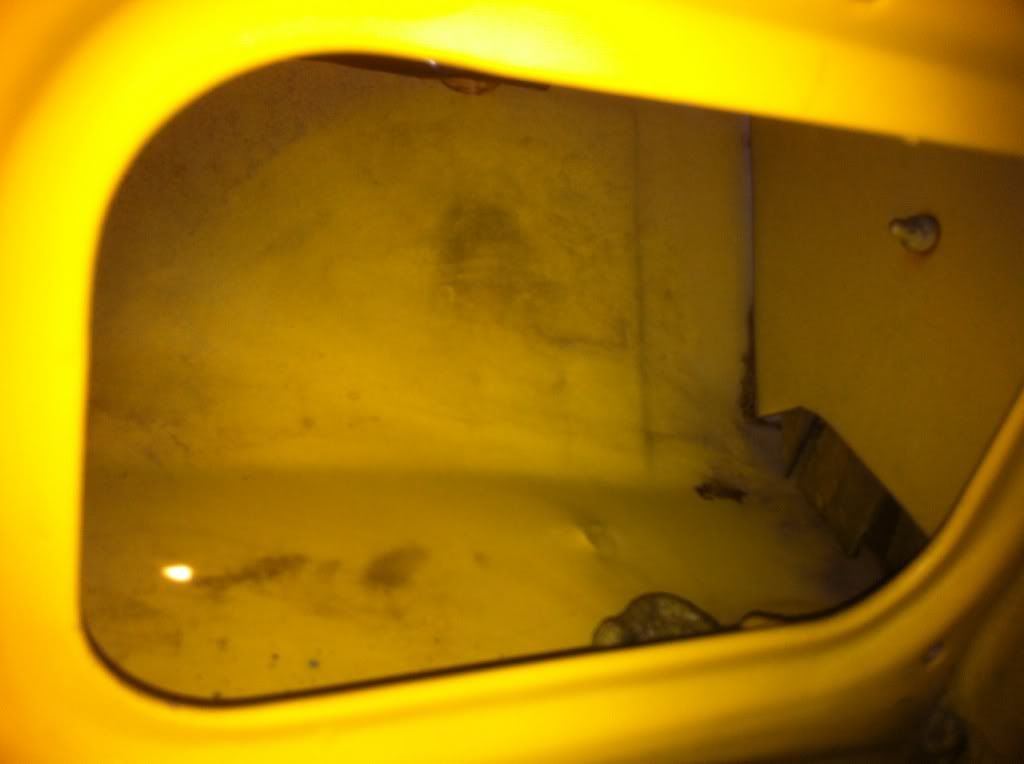 except for yours will be filthy and slimy. just grab some de-greaser and a rag, and clean it out. then it will look as clean as it does in the pic. you can then put everything back together, and do the one that is in the center of the engine bay. Mine was pretty clean, so it was a waste of time undoing all the screws and pulling the cover off, but you still want to check it. Now, your done under the hood, and everything can go back together in the reverse steps you did to remove it. *note when putting the fuse compartment back in, there was a little wedge type thing on mine that had to go back in this slit in the fender so everything would line up properly the little slit in the fender- 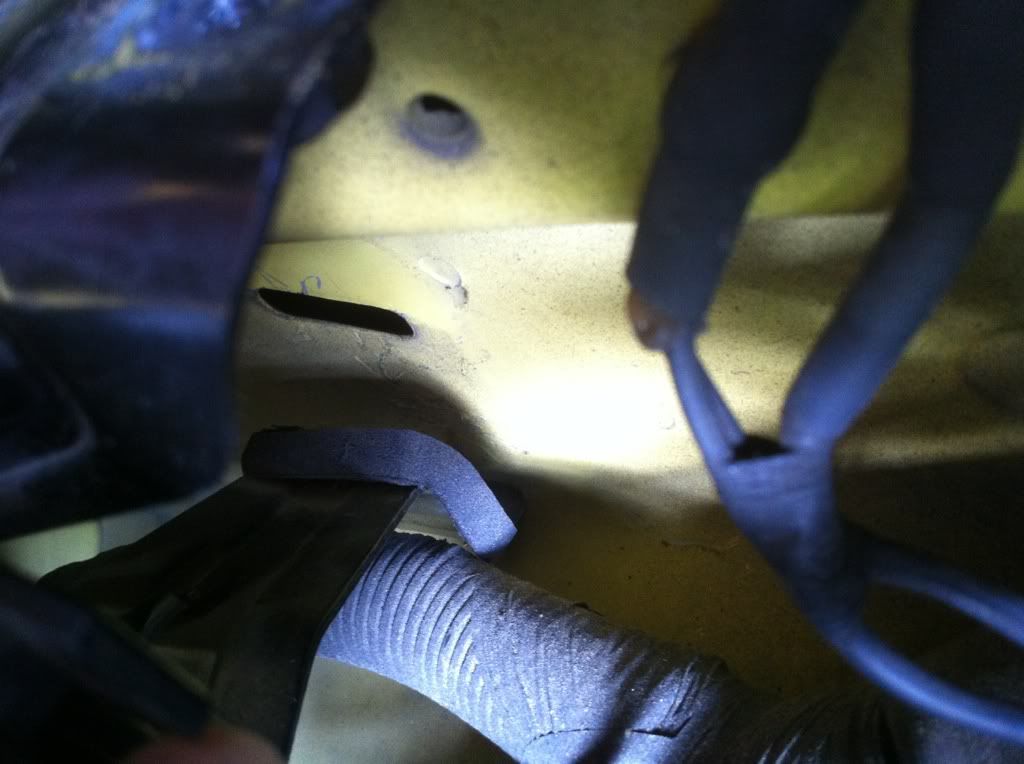 make sure it looks like this when it is all back together- 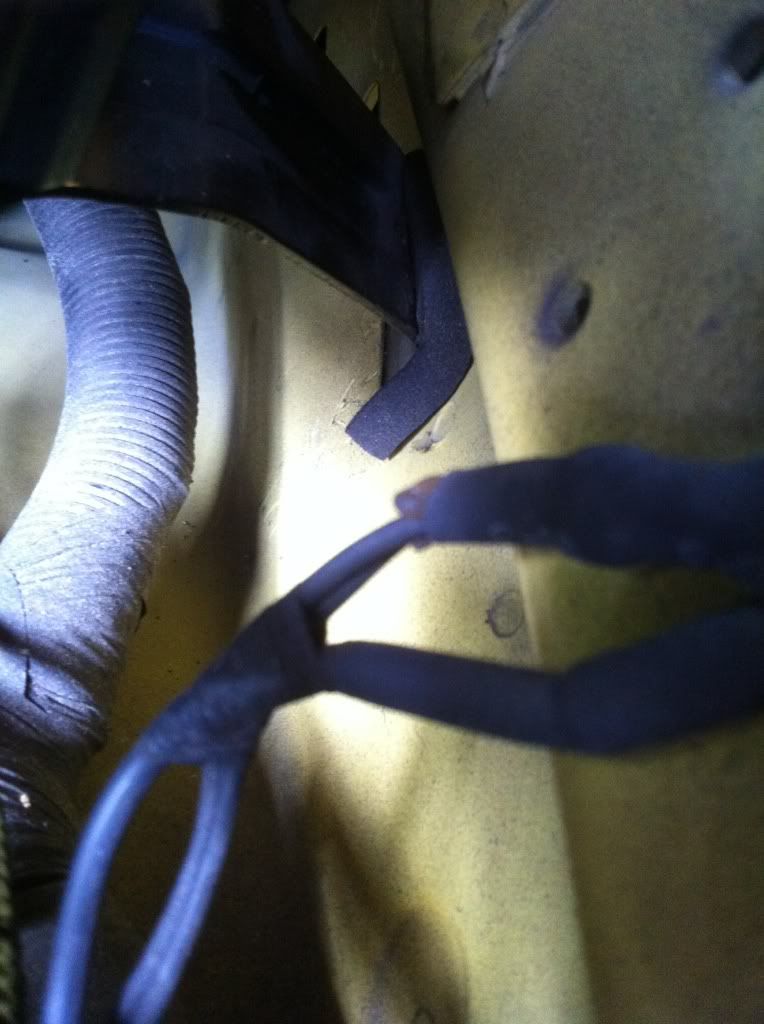 now comes the fun part- on each side of the truck at the end of the fender, close to the doors, there is a little gray box. This is what the water drains into. There is only one tiny hole in the center. It cant really drain the water to well. Box location-  Grab your crows foot tool, and get under the truck. The box is held on with a christmas tree clip. Pull that out, and gently pull the box away from the truck. It will not come off all the way, because something else holds it on. Be careful not to break it. Once you do this, water will start to come out, so be ready. Clean out any trash from the box. Grab the drill and the 3/16 drill bit and put some holes in the box. Make sure the drill is set to as fast as it can go, so you dont crack the plastic. I did 2 in front of the stock hole, and 2 behind it. Dont worry about putting the holes in a straight line or anything like that, because 1)no one will see it, and 2) it wont affect the way the water is drained Do this process for the other side (passenger) as well Pics-  you cant really see, but there are 2 holes behind the stock one as well as the 2 in front as you can see, My holes are not perfect 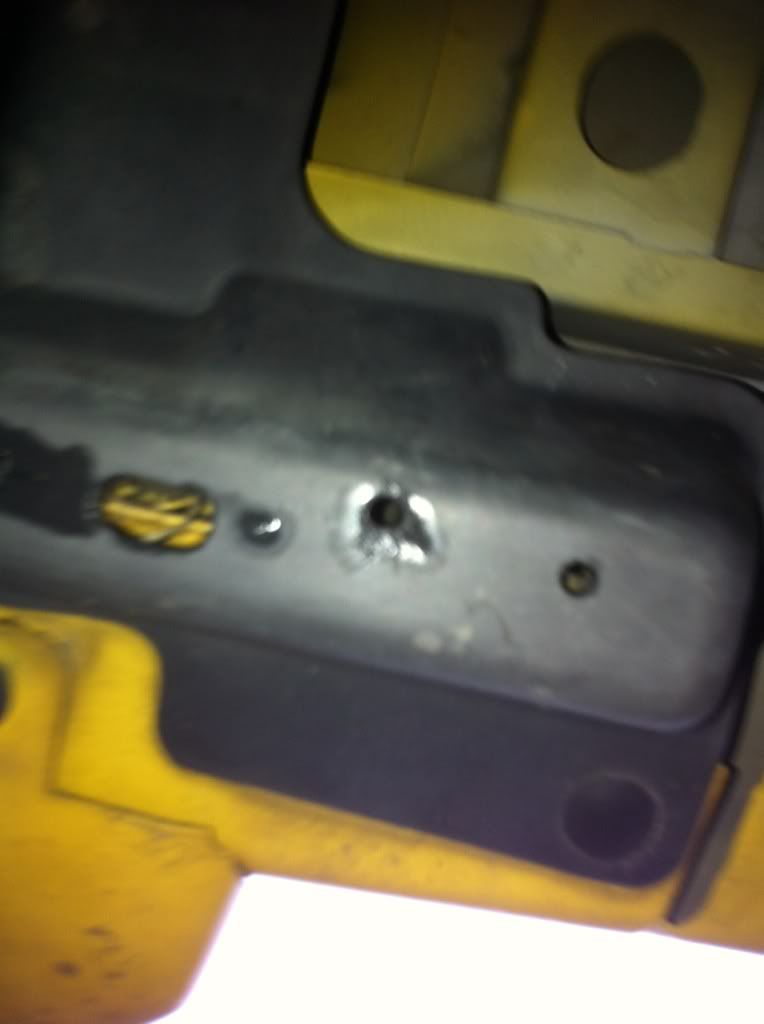 Now, if you want to test the drainage out, get some water and pour it down into the cowl. wait for it to drain out from the box, and admire your work. And thats how you do it. Its a pretty simple mod/fix!
__________________
Chrome Yellow 2001 Ranger Edge 3.0L V6/5spd 
|

| Register and never see these ads again. | |
|
|
|
#3
04-05-2012, 07:10 PM
|
||||
|
||||
|
Quote:
It's a real simple fix. Don't know why ford just didn't do this in the first place! Sent from my iPhone using FRF App
__________________
Chrome Yellow 2001 Ranger Edge 3.0L V6/5spd
|
|
#4
04-05-2012, 07:43 PM
|
||||
|
||||
|
On my 06 there is acouple drainage holes to the left and right of the plastic rivet so I guess they improved on it for the newer years.
Now that doesnt help debris get out lol but as far as water it drains really well. I just hate that on mine isntead of christmas tree clips, alot of them are the one time use plastic gun rivets. But I just have a box of chistmas tree clips that I replace them with lol.
__________________
2006 Ford Ranger Supercab 4x4 XL. 4.0 5spd. To much to list-SOLD! Ill be back 
|
|
#5
04-05-2012, 09:05 PM
|
||||
|
||||
|
Great write up
__________________
White 02' SCSB w/ many mods too come
|
|
#7
04-11-2012, 01:00 PM
|
||||
|
||||
|
I did this on my 2006 Sport, the only problem was dropping my 7/32" socket down the fender. The next step will probably be taking the fender off to get the rocks out of the box at the bottom of the fender. I don't know why ford put something there to catch mud, it would make more sense to just drain out the bottom of the fender.
|
|
#8
12-02-2012, 08:02 PM
|
|||
|
|||
|
Great write-up looks self explanitory gonna clean mine this week sometime. my passenger floor is always damp i thought my floor was rotted by my buddies 96 does the same thing and both of ours only drain from the driver side. so my guess is the drain is clogged. plus both of our trucks are pretty clean underneath. something else to mess with on my truck

|
|
#9
12-02-2012, 09:19 PM
|
||||
|
||||
|
Quote:
Sent from my iPhone 5
__________________
Chrome Yellow 2001 Ranger Edge 3.0L V6/5spd
|
|
#10
12-14-2012, 07:28 AM
|
||||
|
||||
|
So, what if I just snipped off the bottom box. My problem wasn't so much as water sitting in there, but instead, full of muddy dirt. Would cutting it off hurt?
__________________
2002 Ford Ranger Edge V6 3.0L 2WD Reg. Cab painted grille, air box mod, throttle cable mod, dumped after flowmaster 40 series muffler, k&n air filter, tinted windows, 31 BFG A/T tires, sony headunit, sony speakers, 10" kicker sub, 400w mono kicker amp, LEDs!, black headlight mod, 6000k HIDs, LED tail lights to come: tool box, Line-X, under bed rail cargo LEDs, new wheels
|
|
#11
12-14-2012, 10:46 PM
|
||||
|
||||
|
Quote:
Sent from my iPhone 5
__________________
Chrome Yellow 2001 Ranger Edge 3.0L V6/5spd
|

|
#12
08-28-2019, 07:57 AM
|
|||
|
|||
|
Great I did that on my drivers side and cleaned it out. The passenger side has the same problem, but no access hole. Remove the antenna, (pop off cap covering screws, remove 3 screws, lift antenna up and over to side) and you will find a small hole that will let you see the drain ports on that side. I used 2 sticks as chop sticks and picked out all the leaves and debris . The last small parts were picked out using same sticks dipped often into a thick grease that the leaves stick to. Pour water into antenna hole to check drainage.
__________________
2001 Ford ranger. 6cyl, 4L, SOHC, XLT. Replaced engine at 216,900 miles because of timing chain cassette chatter. Installed remanufactured engine from Ford.
|
|
#13
08-29-2019, 01:01 AM
|
||||
|
||||
|
Quote:
Are you THE Mike Carr? The same guy that was around back when I was around a decade ago? The guy whom went by the name "Trigger01" over at Ranger - Forums??? Also, sad to see Ranger - Forums is still blocked without spaces 10 years later. I tried to link an image into my reply but the powers that be decided (still) not to support a competitor forum that existed 5+ years prior. Sad.
__________________
'01 XLT disguised as a '03 Fx4 Level II.
|
|
#14
09-01-2019, 06:10 PM
|
|||
|
|||
|
No I'm not that Mike Car. I only found and joined this forum, this year.
__________________
2001 Ford ranger. 6cyl, 4L, SOHC, XLT. Replaced engine at 216,900 miles because of timing chain cassette chatter. Installed remanufactured engine from Ford.
|
 |
«
Previous Thread
|
Next Thread
»
|
|
 Similar Threads
|
||||
| Thread | Thread Starter | Forum | Replies | Last Post |
| Wet floor, sloshing sound, no drainage from the wiper cowl --> fix | one1 | General Tech | 54 | 10-19-2020 06:55 AM |
| Discuss How To: 98-00 Cruise Control Pod Lighting Fix/Mod | 99offroadrngr | How-To Submissions | 4 | 01-24-2011 07:35 PM |
| Cowl Hood | GONYON | Exterior Tech | 14 | 09-19-2010 09:36 PM |
| How To: 98-00 Cruise Control Pod Lighting Fix/Mod | 99offroadrngr | Interior Guides | 0 | 10-01-2009 02:01 PM |
| Cowl hood | LowBlow | Exterior Tech | 0 | 09-18-2009 12:42 PM |


 |
|
|


 |
|
 |
