 |


|
#1
 06-01-2011, 08:12 AM
|
||||
|
||||
|
I helped a friend make this repair and documented it for FRF members.
Test your pedal assembly by grasping it and trying to move it from side to side. Any side to side movement is wear in the brake pedal assembly. Brake Pedal Assembly: How to replace. This repair was performed on a standard cab 2002 Ranger Edge straight shift. Ranger years range from 1995 to 2003. Possible failure symptoms are: Difficult to depress clutch pedal. Difficult to shift into gear. Brake lights fail to light when depressing the brake pedal or stay on after engine is turned off and releasing the brake pedal. Difficult or failure to start the engine after depressing the clutch pedal. Precautions: Place vehicle on a level surface. Engage emergency brake and leave shifter in gear or place a chock a behind a wheel. Wear clothing you dont mind getting dirty. Allow a minimum of 4 hours to perform this repair. Tools required: 3/8 Drive ratchet. 3/8 Drive long and short extensions. 3/8 Drive universal. 13mm 3/8 drive standard socket. 13mm 3/8 drive deep well socket. Flat blade screw driver. Parts Needed: New Brake Pedal Assembly from Ford parts. Ford part number 6L5Z 2455 BB. Cost is about $95.00 plus tax. Procedure: 1. Remove drivers seat. This allows you to lie on your back where the seat was to work under the dash more easily. 2. Unplug brake stop light switch by depressing the tab on the side of the plug. Refer to photo 1. 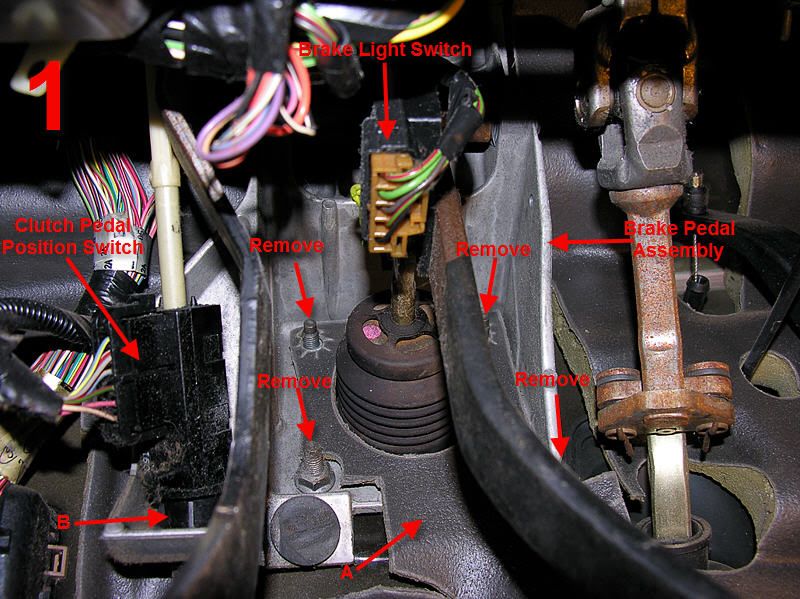 3. Remove pin clip which holds the brake light switch to the brake pedal by pushing pin out the top. I used the screw driver by putting the tip into the loop in the pin and pushing up. Pull the switch off the brake pin which will also remove the brake push rod and bushing. Refer to photo 2 and 3. 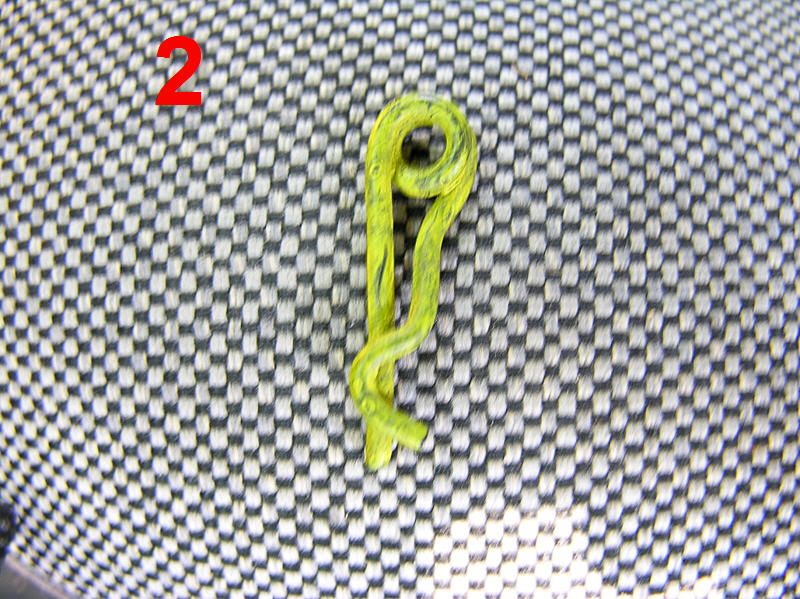 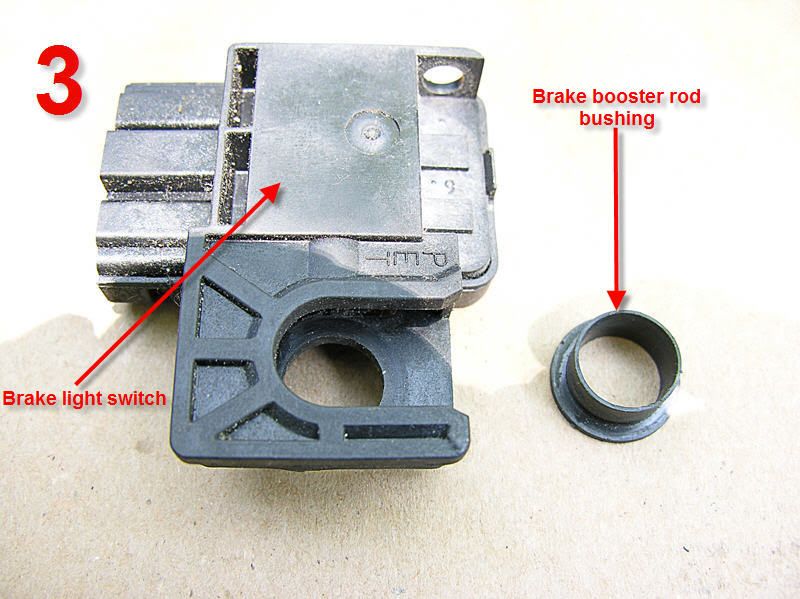 4. Unplug clutch pedal position switch by lifting the two ears outwards while pulling on plug. Refer to photo 1. 5. Un-snap clutch rod by pulling left it should snap right off. I used the screw driver to un-snap. Refer to photo 4. 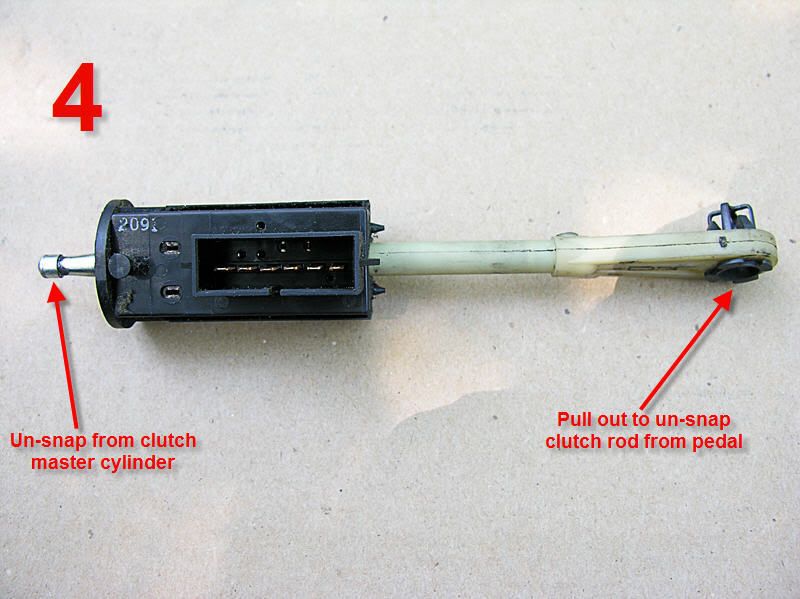 6. Lift up the portion of the flooring covering 4 nuts holding the bottom of the brake pedal assembly. Item A on photo 1. 7. Remove 4 nuts from the bottom of the assembly using the 13mm deep well socket. Refer to photo 1 and photo 5. 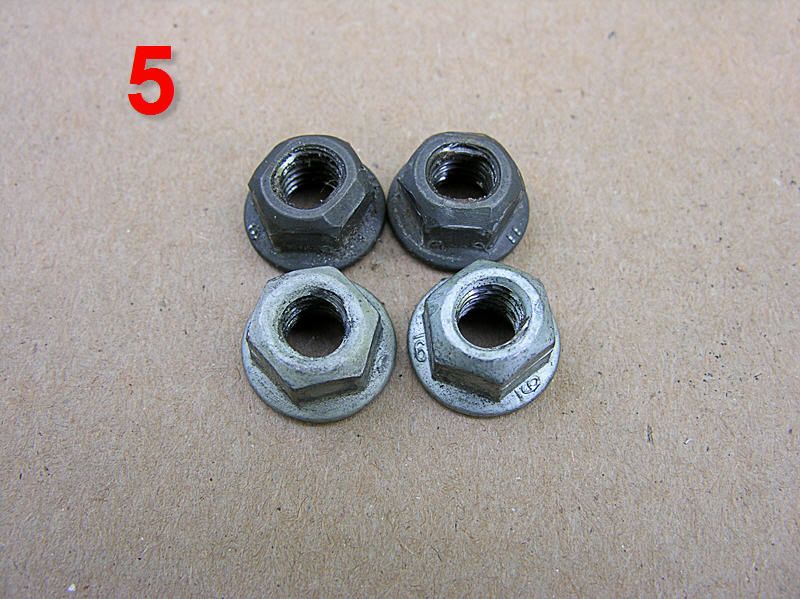 8. Remove 2 bolts from the top of the assembly using the standard 13mm socket, universal and extensions. Not shown in photo 1, refer instead to photo 6. 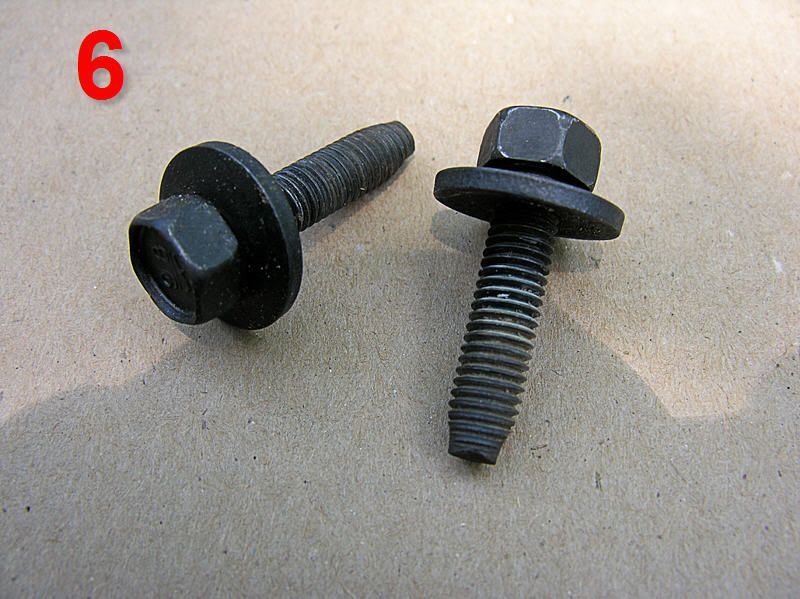 9. Remove enough push pins, bolts and screws to gain access under the inner fender splash shield of the drivers side wheel well. The clutch master cylinder is located under the brake booster. 10. Under the wheel well carefully twist the clutch master cylinder counter clockwise 45 degrees to unlock the master cylinder from the brake pedal assembly. Refer to item B on photo 1. 11. Inside pull out to un-snap the clutch push rod. The clutch master cylinder should now be free from the brake pedal assembly. Refer to photo 4. 12. Remove the brake pedal assembly by moving forward to clear the brake push rod. I had to have a helper to pull the brake booster forward just enough for the brake push rod to clear the assembly. We (helper and I) did not damage or bend the brake lines. Additional space for the booster push rod may be obtained by moving the clutch reservoir to one side. 13. Install new brake pedal assembly and reverse the removal procedure to complete the install. Additional photos: The brake pedal assembly is made of cast aluminum. Old one on the left, new on the right. Notice added material at wear points. 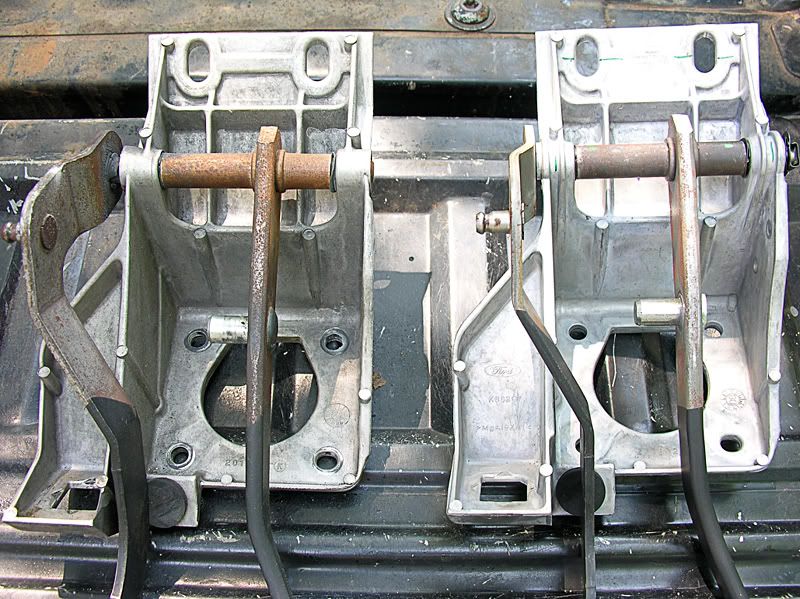 Showing wear areas: 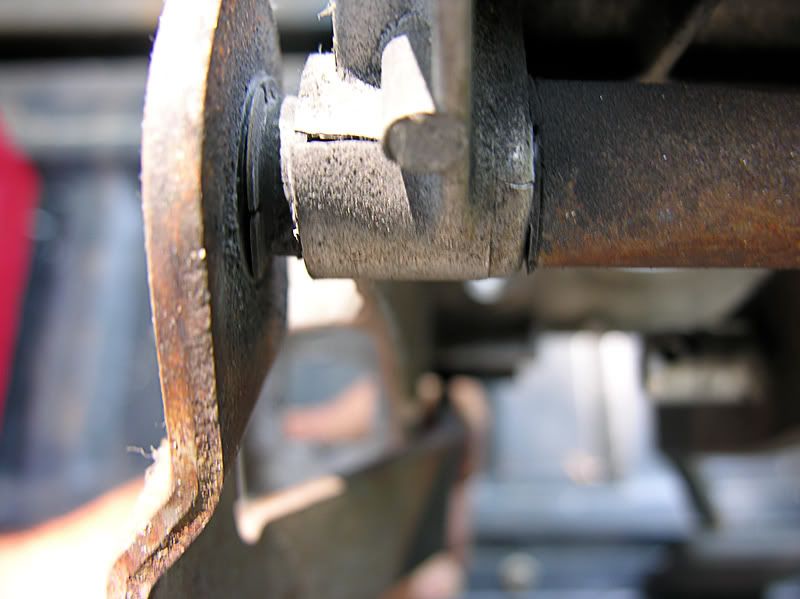 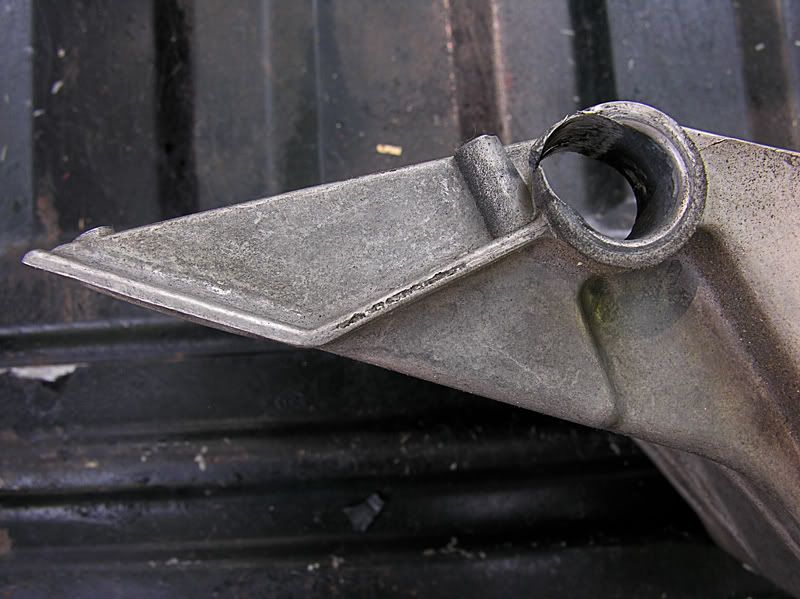 Conclusion: You will have more travel in the clutch pedal and have a more firm brake pedal due to no movement in the pedals. I would suggest you replace the brake light switch as it is a fairly inexpensive item. It wasnt replaced on this truck. Additional access may be gained by removing the bottom half of the dash under the steering wheel. After removing the drivers seat for this repair is still in a very tight and limited space area. Let us know how you did if you perform this procedure. Let us know if you learned any short cuts to making this repair easier.
__________________
2010 Silver Ford Ranger XLT 2.3L 2WD StyleSide Reg Cab Auto, Open 7.5" - 4.10 diff. TruxEdo tonneua cover, rubber bed mat, Ranger all weather floor mats. Last edited by TenSilver; 06-01-2011 at 09:26 AM. 
|

| Register and never see these ads again. | |
|
|
|
#2
06-01-2011, 08:15 AM
|
||||
|
||||
|
id recomend puttng the pictures with the procedures...going back n forth is lame
 otherwise. NICE WRITE UP
__________________
Ford Ranger Edge Supercab, 2004 3.0 Auto, 2WD, 4.10 Axle 31x10.5x15 BF Goodrich All Terrain T/A KO's My Truck Is My Mountain Bike's Ride!  Class III hitch, Rhino Bedliner, Almost Maxed T-Bar Crank, Tuff Country Add A Leaf, Custom Low Anchor Points, OEM ('99) Tow Hooks, Pro Comp Offroad Lights , Mustang Dome Light, Clear Corners, Slim Toolbox, Blinker Mod,Cargo Brake Light Mod,Expo Lighted Visors, Ultra Silverstar heads/fogs, Fog/high mod, Reverse/switched lights, Bike Fork Mounts
|
|
#3
06-01-2011, 09:21 AM
|
||||
|
||||
|
Will do. Thanks!
__________________
2010 Silver Ford Ranger XLT 2.3L 2WD StyleSide Reg Cab Auto, Open 7.5" - 4.10 diff. TruxEdo tonneua cover, rubber bed mat, Ranger all weather floor mats.
|
|
#4
06-01-2011, 09:28 AM
|
||||
|
||||
|
Fantastic! great write up. I wish I had a camera and "a" forum when I did my trans swap. That was a great experience with lots of info had I documented it. How was it for you getting that assembly out? it was a PITA when I took mine out to put in the clutch assembly!
__________________
1999 | Ext. Cab | 4.0 | 4x4 | 4.10's Quote:
Replace Door pin/bushing Repair broken dome light tabs VIDEO OHC Install
|

|
#5
06-01-2011, 12:30 PM
|
||||
|
||||
|
^^ Thanks! ^^
It was an interesting project for sure as the work was done under a tree in 95 degree heat. Lol! The most difficult was getting the two top bolts shown in photo 6 and getting the brake assembly to clear the booster push rod. Interesting that once the two top bolts were out I could see light up through the vent holes near the wipers. Still I think additional work room could have been had if we removed the bottom portion of the dash under the steering wheel.
__________________
2010 Silver Ford Ranger XLT 2.3L 2WD StyleSide Reg Cab Auto, Open 7.5" - 4.10 diff. TruxEdo tonneua cover, rubber bed mat, Ranger all weather floor mats.
|
|
#6
07-07-2011, 05:35 PM
|
||||
|
||||
|
How did you unsnap the the master cylinder push rod out of the master cylinder? i tried pulling left like it says but nothing is happening. does it take a lot of strength? Because that little rod is bending a lot and i dont wanna break the end of in the master cylinder.
thanks
|
|
#7
11-02-2011, 04:15 AM
|
||||
|
||||
|
Wow! I don't know how I missed your question! Sorry about that!
Yes, It was pretty hard to get it to un-snap. I pulled and pushed it to the left and it poped right out. Again sorry for the long delay in replying.
__________________
2010 Silver Ford Ranger XLT 2.3L 2WD StyleSide Reg Cab Auto, Open 7.5" - 4.10 diff. TruxEdo tonneua cover, rubber bed mat, Ranger all weather floor mats.
|
|
#8
12-04-2011, 09:00 AM
|
|||
|
|||
|
Thanks for the very helpful instructions. My only problem was that the clutch pedal rod definitely would not "unsnap" from the master cylinder. It was held in by a black spring steel capture clip which was behind a circlip. I pulled until the circlip came out along with a white plastic part from inside the clutch cylinder. I was able to pry the black spring steel piece out of the plastic part to release the clutch pedal rod. Installation required compressing the circlip and pushing it back in. I'll try to post a picture of the end of the rod with the circlip. It may be necessary to reach into the end of the clutch master cylinder with circlip pliers to release the clutch pedal rod.
|
|
#9
12-12-2011, 10:38 PM
|
||||
|
||||
|
Thanks for this write-up! I'll be performing this procedure this week on a 2004, and it seems like everything looks the same, except the brake switch clip looks different. I'll let you know how it goes, and hopefully I'll have some pictures to post. Thanks again, very helpful!
__________________
2004 Black Ranger Edge Supercab 4.0L SOHC, 5 Spd Manual Flowmaster 40 Series Single In Dual Out 31X10.50R15 Federal Couragia A/Ts Bedlined: Mustang Dome, Explorer OHC w/ Buggman LED Panel  , Radio Bezel , Radio Bezel
|
|
#10
01-18-2012, 01:44 PM
|
||||
|
||||
|
Success! The pushrod was a PITA to remove from the clutch master, but it's finally done. Looking at the pedal assembly, I can definitely see why there was so much play back and forth:
 Thanks again for the write-up.
__________________
2004 Black Ranger Edge Supercab 4.0L SOHC, 5 Spd Manual Flowmaster 40 Series Single In Dual Out 31X10.50R15 Federal Couragia A/Ts Bedlined: Mustang Dome, Explorer OHC w/ Buggman LED Panel , Radio Bezel
|
|
#11
12-31-2013, 05:30 PM
|
|||
|
|||
|
Hey guys, thanks so much for posting this. I wouldn't have known where to start without it. Who knew something with 6bolts/nuts could take so long to fix...
I've got to say though, I got a universal joint which made a lot of the ratcheting easierexcept for one bolt on the top.
|
|
#12
05-14-2014, 01:33 PM
|
|||
|
|||
|
I would like to add that I just performed this and the forum helped greatly. I certainly would have broken something or given up without it. However, one thing, I did not want to chance breaking the clutch push rod so I removed the switch surrounding it, allowing it to slip through the bracket. A link for removing the switch......http://www.makeonlinecollection.com/...ft-Pedal!.html
Last edited by lurebuoy; 05-14-2014 at 01:38 PM.
|
|
#13
07-30-2018, 11:53 AM
|
|||
|
|||
|
Thanks for the great illustration and procedure - I think the failure of this part is the reason my 96 Ranger clutch safety switch won't work. I had replaced the safety switch, which temporarily fixed it, however, the problem re-occurred and it wasn't remedied with another switch replacement.
Can't recall how I found this topic, but I'm glad I did. In looking at the part in my vehicle, I can see that there is wear (cracks, excessive play, etc.) The straw on the camel's back was I have to slam the clutch (often several times) to the floor, while turning the ignition to get the engine to start. Aside from parking on hills to guarantee that I can drive away, I have to get this fixed because complete failure is pretty much the next bad event. I'd be curious if anyone else has arrived at a similar conclusion. I'll definitely post my results once I obtain and replace the part.
|
|
#14
08-21-2018, 12:48 PM
|
|||
|
|||
|
Well its all back together and working fine. What a relief for a 65 year-old non-mechanic. Im sure I saved a great deal of money doing this myself, but the thanks and credit goes to all that have contributed on this site.
Not that it wasnt easy to do all of this, the tough part for me was finding the clutch master cylinder. Mainly because Im lookin for something big and metal. The problem was it wasnt big and not medal at all. So, Ill try to add a photo of the it in the firewall so those unfamiliar will be a bit more informed. So, forcefully twisting it 45 degrees was a crap shoot, but it paid dividends to me. That was all it took to detach the master cylinder from the clutch/pedal assembly. https://photos.app.goo.gl/93rwPVyfy4ZFKhoQ7 The first photo is viewing the master cylinder from under the hood of the truck. You can see where the booster was mounted prior to being removed. The master cylinder is to the lower left. The second photo shows the view under the dashboard. The master cylinder is yet to be reinstalled back into the clutch pedal assembly. Try as I might, I could not unsnap the clutch rod from the master cylinder. But I was able to pull out the old clutch pedal assembly and place the new one in position without the necessity of disconnecting the clutch rod from the master cylinder. After getting the replacement clutch pedal assembly bolted in place, it was difficult to re-twist the master cylinder in place in particular without assistance. I finally got under the dash and used pipe pliers to turn it 45 degrees while simultaneously pulling it into the clutch pedal assembly and amazingly it worked. It was difficult putting the brake switch back in place, but I used an exploded diagram I found online to successfully put it back together.
|
 |
«
Previous Thread
|
Next Thread
»
| Thread Tools | Search this Thread |


|
|
 Similar Threads
|
||||
| Thread | Thread Starter | Forum | Replies | Last Post |
| Brake Pedal | Bighomedog11 | 2.9 Liter Tech | 18 | 05-30-2011 12:46 AM |
| Want to Buy: Parking Brake pedal assembly | Denny177 | Interior Parts | 2 | 05-06-2011 05:44 PM |
| Brake pedal | glorioussnookie | Drivetrain Tech | 3 | 02-15-2011 02:51 PM |
| Want to Buy: E-brake pedal assembly for 89 Ranger | Audinos | Interior Parts | 0 | 02-12-2011 01:11 PM |


 |
|
|


 |
|
 |
